Get your FREE GUIDE '7 Steps to grow a Quilt Pattern Design Business'
blow your mind
How do you make a plant into fabric? When we visited Otzi, the 5000 year old human found in the pre-alps about 3 hours drive
Get your FREE GUIDE '7 Steps to grow a Quilt Pattern Design Business'
Get your FREE GUIDE '7 Steps to grow a Quilt Pattern Design Business'


Welcome to the How to Design a Quilt Series.
This is an ongoing series about all the phases of designing a quilt. I talk about quilts here because I am a quilt maker. But you can apply this design process to any medium you like – painting, drawing, embroidery, whatever your jam is.
In this journal entry, we’ll cover the first stage of designing a quilt – coming up with an idea. This design process is based on my working system that I have honed over many years as a designer and quilter. And it consistently produces an effective design and is a proven way to get not only an idea for a quilt design, but a good idea for a quilt design.
Your first question might be: Is there a quilt design app? Or How do you design a quilt on the computer? Or even What program do you use to design quilts.
I’ll be straight with you: I am very analogue at the beginning of the design process when it comes to designing quilts. I do everything on paper before I take it to a computer.
You might think I am archaic, but this is the way that works for me. There is a real physical connection between my head and my hand, and I can get an idea down on paper much faster and more directly using a pencil than I can using a stylus or an apple pencil. You might be different.
Use whichever tools you are comfortable with and that work for you. If you feel like when you work on the iPad you have to keep stopping and erasing, or searching for the right tool, you might like to try stepping back and simplifying.
let's get stuck in
Ideas are a dime a dozen. It’s what you do with that idea next that makes a really effective design.
Let’s start at the beginning and see how to come up with an idea in the first place. I know I know, you might be thinking, “but Ally I am already brimming over with so many ideas!”
What about those times when you are just stuck for an idea and can’t seem to break out of the ‘idea desert’ where you just don’t seem to be able to come up with an idea or the right idea. This process will help you come up with an idea 100% of the time.
Chuck Close once said:
“inspiration is for amateurs” .
chuck close
And I tend to agree. His quote can be taken out of context, but here’s a link to the full quote and further discussion of this theme.
Basically, you can’t just wait for lightning to strike for that great idea to jump out of the sky and knock you on the head.
Another way of talking about this is ‘waiting for the muse’. You need to set yourself up for a visit from the muse. You need to welcome those ideas in, and not just wait for them to happen to you.
The first step is to be active – go seeking inspiration actively. Seek it out. Don’t wait about passively for inspiration to strike.
How can we do this?
Open your eyes. See the world around you. Go on a walk not to walk the dog, but to discover new ideas
Be actively aware of your surroundings, looking for things that might be a great source of inspiration for a quilt idea. You don’t even need to be thinking “I need to see something that looks like a quilt”.
It can be anything: shadows, the shape of a leaf, the outline of a series of buildings, the colours someone is wearing, the numbers on someone’s letterbox. And that is just around your neighbourhood.
What about going to the local library, art gallery, art supply shop (ok, be careful! And don’t say I didn’t warn you!), quilting shop…
If you want to come up with a truly unique idea, try to stay away for the regular sources that others might also seek out when designing quilts. So, quilt shops might not be your best bet on second thought.
What about nature? Plants in your garden, the local nursery, or park. A trip to the botanical gardens in your local city.
Go for a drive to the hills, or the plain, to the beach or somewhere that is not where you are right now. What new foliage, shapes, colours, patterns can you see?


Remember there is no right/wrong answer here.
You are unique, you have a unique design perspective on the world.
No one else has the same inputs as you – experiences, views, taste, series of events.
This is what allows you to connect the dots on two or more things that someone else might overlook, or not even recognize as something to use.
This is your unique design voice.
So, that’s great. We’re opening our eyes, and can see a whole new world of possibilities Now what? Are we just supposed to look?
How do you record all this goodness?
I like to use sketching as a way to jot down ideas. I’m not talking about a 6hr landscape painting. I’m talking a about a 2min sketch to capture an idea. It’s not a masterpiece, you are not painting haystacks everyday at dawn here.
You are going for a quick sketch to get the idea down on paper. Include as much or a little detail as is enough to remind you of what you saw, and the shapes or colors or patterns that caught your eye.
Here are some examples of my NON-masterpieces that have led to quilt ideas

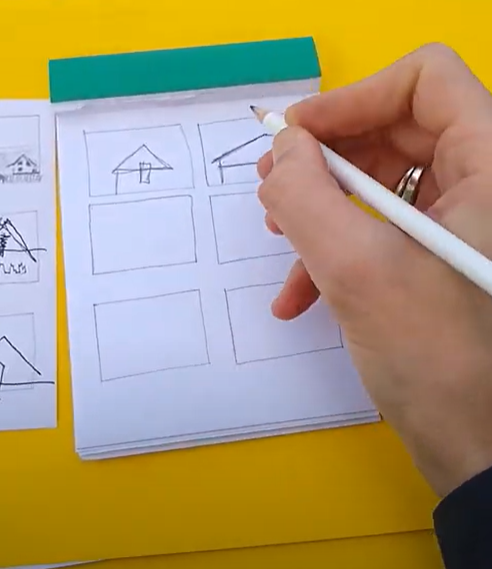

Another way to capture that inspiration is to take a photo. I prefer the sketching method as you’re really abstracting out the idea and further removing it from reality, thereby making it even more your own. You also have an immediately deeper understanding of the subject you are trying to draw.
A photo is great if you don’t have time, or need to stand in the middle of a busy road to get the shot that you need (please be careful!), but if you have the time, my advice is to sketch it.
Once you have your ‘inspiration photo’, go back home, or get somewhere quiet, and look at that photo and start to draw from it.
This is another way you can really home in on what it is that you want to see, or a way to see secondary shapes that might not have been evident when you took the photo.
Sketching from your photos is another way you can really home in on what it is that you want to see, or a way to see secondary shapes that might not have been evident when you took the photo

This step is the key to actaully doing something with all that inspiration you have been seeking out. And it’s the REVIEW waht you have gathered.
The key to taking photos is not ‘frame it well, make sure you use the rule of thirds etc.’, it’s to review your photos after you take them.
Once you have gone out and about and snapped something that you though was photo-worthy for quilt inspiration, don’t leave it languishing on your phone gathering digital dust. I talked a bit out this review of photos in another of my journal posts which you can find here.
This applies to your sketches too. Review them! See below for some tips on how.
The key is to review: review your photos, review your ideas. But…. That throws up another problem. There is SO. MUCH. INSPIRATION. How do you manage all these ideas?
We talked a bit at the beginning of having too many ideas of already being full up with ideas. This can be overwhelming! If this is the case, what can you do?
You need a system. It’s overwhelming to have to hold onto so many ideas all the time. Where do you start? Oh no, don’t forget that one. It’s slipping away. Quick catch it!
A sketchbook is a great way to keep a record of your ideas. You can feel relaxed knowing that you have safely deposited and stored your idea in a sketchbook, that you can return to it at a future time.
I keep my sketchbooks close. I have one on hand a lot of the time. When I see something that I want to note down, write it down, or doodle it right away. Again, you don’t need to spend a lot of time on it, just a quick sketch or two lines of writing to describe your idea. It’s not a masterpiece, it’s a note to self of something to return too.
Again the key here is RETURN to. Those ideas are stored away, and you might not even get to all of them, and that is ok. But when that well runs dry, or you are stuck for an idea for a specific occasion or person, leaf back through your safety box of ideas, and see if something there sparks a new idea, or maybe you’ll happen upon the perfect idea that you had forgotten about.
So there you have it. Just to recap:
1. Seek inspiration: be active and gather things to generate new and different ideas that are unique to you.
2. Capture that inspiration: use sketching and photography, or writing. Any medium that helps you remember the idea.
3. Review those captures: actually go back and look at those photos you took, review your ideas sketchbook occasionally to generate or remind yourself of ideas you had.
The next step in the series is looking at what to do now that you’ve got an idea. (I’ll give you a hint, it’s not start cutting the fabric – yes I am an Enneagram 8 so I know all about the jumping in and getting started without thinking things through part…)
If you’d like to jump ahead and get an overview of what I’ll be exploring more deeply in this design series, you can download the guide ‘Design your own quilt in 5 steps’ by clicking on the image below.

Check out these resources:
How do you make a plant into fabric? When we visited Otzi, the 5000 year old human found in the pre-alps about 3 hours drive

What would it look like if I designed my own quilt?
Galileo, Steve Jobs + Elon Musk walked into a sewing room…
Next up: How to design a quilt – Step 2: Iteration (coming soon).
Enter your email to receive a link to download the guide